
What you’ll build
You will create a small, testable bundle and take it from the Select bundle builder type screen to a preview that is ready for storefront placement. The goal is not to configure every optional feature on the first pass. It is to establish a complete offer whose products, selection rules, price, and placement you can verify with confidence.
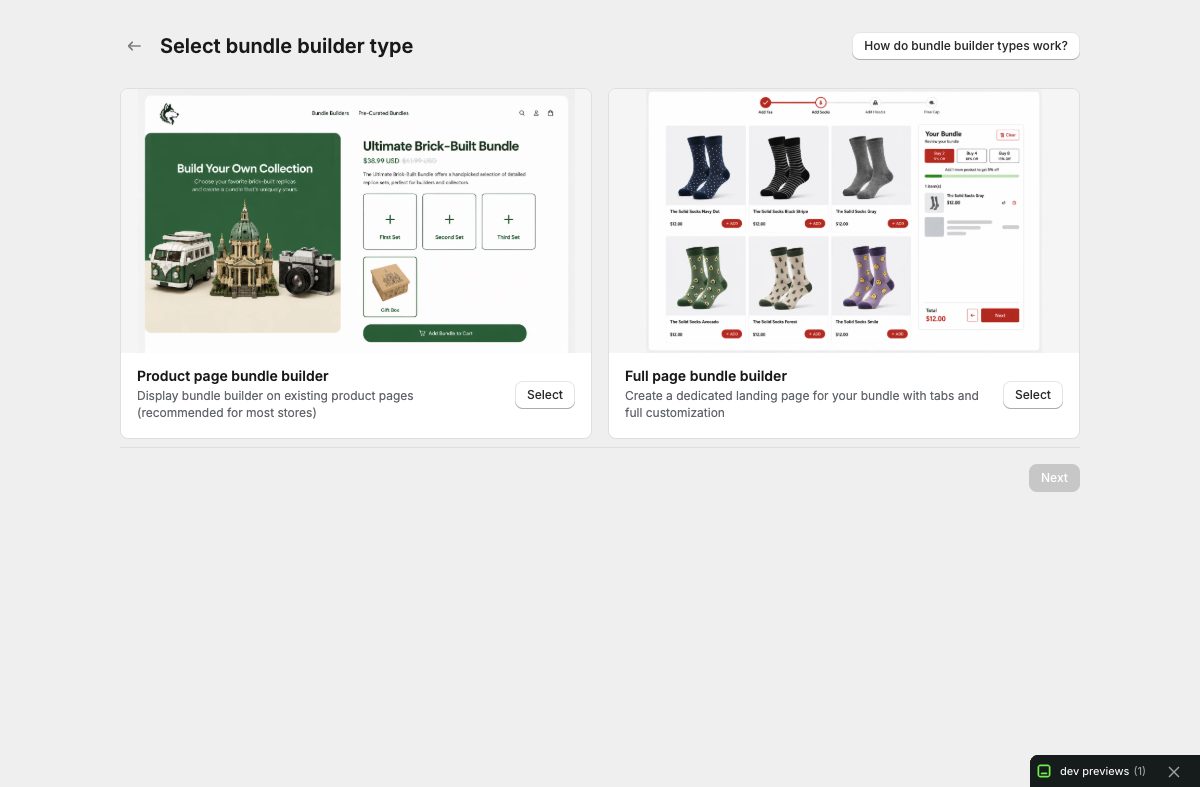
Only Bundles provides two surfaces. A Product Page Bundle places a mix-and-match experience in the context of an existing product page. A Full Page Bundle gives the offer a dedicated, guided journey with steps and categories. Both can support rich merchandising, but the right starting point depends on how customers should shop.
Before you begin
Prepare a short list of active Shopify products with usable images, prices, and in-stock variants. Decide the simplest valid combination a shopper should be able to buy. For example, a starter routine might require one product from “Choose a base” and two products from “Choose your extras.”
Also confirm that you can edit the active theme. Theme placement happens through Shopify’s Theme Editor. Only Bundles does not need a separate custom script pasted into the theme, and the app should not replace Shopify’s ownership of products, variants, inventory, cart, or checkout.
1. Choose the bundle surface
From the Only Bundles dashboard, select Create Bundle. The next screen presents the two builder types.
- Choose Product page bundle builder when one product anchors the offer and the bundle should appear beside the product’s existing buying experience.
- Choose Full page bundle builder when customers need to move through several choices or when the bundle itself is a campaign destination.
If you are learning the app with a very small catalog, either surface can work. Choose based on the intended customer journey rather than the number of settings you want to explore.
2. Name the bundle and add the first products
Use a merchant-facing name that describes the outcome, such as “Build Your Morning Routine,” rather than an internal campaign code. Add the products that belong in the first decision. If a product has variants, remember that the shopper ultimately buys specific variants; check titles and availability before relying on the preview.
For a Full Page Bundle, organize the assortment into steps and categories. Give each step one clear job. For a Product Page Bundle, add the eligible products to its category and choose how variants should be presented. Dropdowns are a dependable default; pills or swatches work best when their labels and imagery are meaningful.
3. Define a rule customers can understand
Set the selection or quantity requirement for each step or category. A rule should answer, before the customer clicks anything, how many selections are required and whether they may continue choosing after the minimum.
Start conservatively. A requirement such as “select exactly three” is easier to test than several overlapping ranges. Confirm that the rule is satisfiable with the variants currently available. A beautiful bundle that cannot reach its required count is not ready to publish.
4. Decide whether the first version needs an incentive
You can launch a coherent bundle without a discount. If the offer needs one, open Discount & Pricing and choose the single pricing model that expresses the promise: percentage off, fixed amount off, fixed bundle price, or an eligible Buy X Get Y configuration. Preview the calculation with more than one combination, especially when product prices differ.
Leave gifts, add-ons, subscriptions, targeting, and advanced design for a second pass unless they are essential to the offer. Each adds another state to verify in the storefront and cart.
5. Review readiness and preview the journey
Use the editor’s readiness feedback to find incomplete required fields. Then open the preview and behave like a first-time shopper:
- Read the instruction before making a selection.
- Choose the minimum valid combination.
- Change a variant and quantity.
- Confirm the progress and summary update.
- Remove a selection and check that the incomplete state is explained.
- Review product names, prices, savings, and the final total.
Preview is a safety tool, not proof of a live storefront. It lets you refine a draft without exposing it to customers.
6. Save deliberately, then place the bundle
Keep the bundle in draft while you are still changing its structure. When the offer is complete, use the Visibility area to choose the intended public state and follow the placement instructions for its surface. Product Page Bundles need their Shopify app block on the correct product template. Full Page Bundles use their dedicated bundle route and require the Only Bundles app embed in the active theme.
After saving, test the storefront in a fresh, cache-bypassed page. Complete a valid selection and inspect the Shopify cart. Verify the actual component variants, quantities, discounts, gifts, paid extras, and total—not only the builder summary. Stop before placing a real order unless your store has an approved test-order procedure.
Troubleshooting
The preview has no products. Reopen the relevant step or category and confirm that active products or collections were added. Check whether every selected product still has a purchasable variant.
The customer cannot continue. Compare the quantity rule with the available choices. A required count may be impossible after sold-out variants or category edits.
The bundle is saved but not visible. Check its status, the app embed, and the correct Theme Editor placement. Product Page Bundles also depend on the product using the template where the app block was saved.
The cart differs from the preview. Treat Shopify cart data as the decisive result. Recheck variants, quantities, selling-plan compatibility, and discount eligibility before making the bundle public.
Launch checklist
- The bundle name and instructions describe the customer outcome.
- Every required step or category contains eligible products.
- Selection rules can be completed with currently available variants.
- Pricing is correct for low-priced and high-priced combinations.
- Desktop and mobile journeys are readable and operable.
- The correct app embed or app block is saved in the active theme.
- A valid bundle reaches Shopify cart with the expected components and total.
Once this smallest complete version works, add one advanced capability at a time and repeat the same preview, storefront, and cart checks.